I recently setup a private repository at work for shared workflows that we can reuse across our Go based micro-services. If like us, you have a number repositories performing similar Github actions, you may want to do the same.
Now the Github docs can be a little unclear on how to set this up. For one, they mention this can only be used for public repositories unless using Github Enterprise, which is contradicted in a separate article. But it's actually rather straight forward.
Setting up a shared workflow
To get started, lets created a central repository for our shared workflows - this can be private. Once created, you'll want to create a .github directory with another directory called workflows inside it, like normal for workflows.
We'll create a simple action that just echo's some text for this guide, echo.yaml, but feel free to use your own. We also need a properties file which shared the same name, but replacing .yaml with .properties.json, i.e. echo.properties.json.
Once created, you repository should look like this:
.
└── .github/
    └── workflows/
        ├── echo.yaml
        └── echo.properties.json
As for the contents of echo.yaml, we'll use this as simple example:
name: Echo

on:
  workflow_call:

jobs:
  build:
    runs-on: ubuntu-latest
    steps:
      - uses: actions/checkout@v3
      - name: Echo a message
        run: echo Hello World!
And for the echo.properties.json:
{
    "name": "Echo workflow",
    "description": "Simple example workflow",
    "iconName": "example-icon",
    "categories": ["Example"]
}
You can find more properties documented here on step 4.
Now we have a basic workflow, lets commit and push it to the origin.
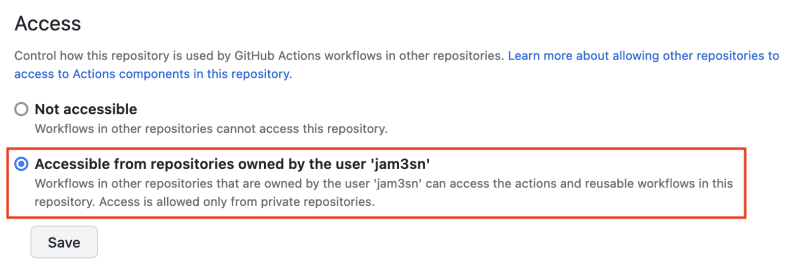
Before we can use this though, we need to update the repository settings to make the workflows accessible to other repositories. Go to the repository settings and from the side bar, Actions > General, scroll down to "Access" and change it to "Accessible from repositories owned by the user (or organisation)".

Using a shared workflow
Now we have our shared workflows repository setup, lets put them to use in a separate repository.
In this repository, you'll once again want the .github/workflows directory setup, along with a new workflow yaml to reference the shared workflow. I'm going call this call-echo.yaml.
Using the shared workflow is actually really straight forward. We add a job, name and the use: syntax, along with a path to the workflow.
This path starts with your github username, or the organisation name, followed by the repository name, in my case jam3sn/shared-workflows/. This is then followed by the path in the repository to the workflow file and a version, .github/workflows/echo.yaml@main. The version can be either a commit SHA, a branch, or a release tag. In my case, I'm just using the main branch.
The resulting path should looks something like this:
jam3sn/shared-workflows/.github/workflows/echo.yaml@mainAnd used in the workflow file:
name: Call echo

on:
  push:

jobs:
  call-echo-workflow:
    uses: jam3sn/shared-workflows/.github/workflows/echo.yaml@main
Now you might want to pass some inputs and secrets to be used in this workflow, these might be an application version, or an access token. So we'll add these to the shared workflow like so:
name: Echo

on:
  workflow_call:
    inputs:
      message:
        description: 'Message to echo'
        default: 'Hello'
        required: false
        type: string
    secrets:
      TOP_SECRET:
        required: true

jobs:
  build:
    runs-on: ubuntu-latest
    steps:
      - uses: actions/checkout@v3
      - name: Echo a message
        run: echo $ $
You can see we've defined the input message and the secret TOP_SECRET, and then used them in our job.
I should state it's obviously a terrible idea to echo a secret!
Now lets update our caller workflow file (call-echo.yaml) that uses this shared workflow:
name: Call echo

on:
  push:

jobs:
  call-echo-workflow:
    uses: jam3sn/shared-workflows/.github/workflows/echo.yaml@main
    with:
      message: 'Ahoy!'
    secrets:
      TOP_SECRET: 'Agent 47'
Note: if you're using secrets, Github has a secure way to store and use them as documented here.
That's it. You can find further documentation from Github here, although it's somewhat like searching for a needle in a haystack.